
The Chronometer(s)
StudyLTCOVID.com
Thanks for visiting!
To translate this page, select your
language from the dropdown menu below:
We'll present first on this page, the Chronometer or Stopwatch and its use.
It is used principally to time questionnaires.
Second, at the bottom, our Countdown Timer. It's much like a kitchen timer.
It's perfect for setting a 5 minute period and getting a reminder beep at 0.
It is used principally to time 5 minute intervals when resting and when recovering
from the protocol's marching test.
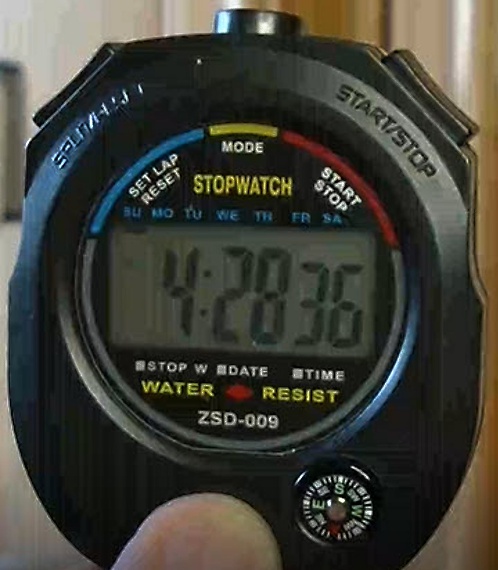
Chronometer Buttons and settings:
Start/ Stop button on right
Lap/ Reset button on left
Middle button on top
For purposes of our study, few settings and button-pushes are required:
1. Push middle-top button until ‘00:00oo’ is seen on the display.
2. Push Start/ Stop button on right to start timing. It’s counting up in seconds and hundreds of a second. Push again to stop. Note result.
3. Push Lap/ Reset left button to reset to Zero.
Here's a short video to show the basics ...
The chronometer is used during measurement of Vital Signs:
- To accurately time the 5 minute rest period, then it's reset to zero.
- To start timing from time 0, immediately after the Walking Test when Vital Signs are repeated.
- To visually check from time to time to see when 5, 10 and 15 minutes have elapsed since the end of the Walking Test. That’s when the Recovery Vital Signs measurements are obtained. The more precise you can be about those intervals, the more accurate and useful will be your results. So use the chronometer.
The chronometer is also used during the Mental Status Questionnaire to accurately time the duration of the test from start to finish. That value is entered as the last entry in the questionnaire. Here’s how to use the device for this:
- Click the Lap/ Reset button on the left to reset device to Zero.
- As you begin taking the test, click the Start/ Stop button on the right. It starts counting elapsed time.
- As you finish taking the test, click the same Start/ Stop button again. There's a reminder written in the questionnaire to stop the chronometer and check its displayed value.
- Note the reading, and enter minutes:seconds:hundredths in the space provided at the questionnaire’s last question.
- Click the Lap/ Reset button on the left to reset the device.
Other things to know about setting the device and the button-pushes required.
One can set the time, date, an alarm time, and turn the alarm on or off.
These are explained below.
The device is battery operated which brings up the subject of changing batteries. This probably won’t become necessary during this study. Leaving the device on the ’00:00oo’ display instead of the clock, may save on battery life.
Changing the battery requires a small Philips (cross-point) screwdriver and the new battery. A flat-head screwdriver works also, but it has to be tiny and just the right size to grip the screw.
Once the back is disassembled, remove the battery and replace. The equivalent of the AG13 button battery already in place is an LR44, A76, or a V13GA if you have to shop for one.
If someone asks, its dimensions are 11.6mm diameter and 5.4mm thick (see the picture).
This short video below shows that process.
Now that you can change the battery, what about those three buttons?
Again, for the purposes of our study, most of the following adjustments to the chronometer are not necessary. They are provided nevertheless for those who like to have a device like a watch, that is perfectly setup.
Setting up Time, Date, Day of Week and Alarm.
(For purposes of this study, all functions available, are not actually necessary).
This describes button(s) to push and results obtained.
To simplify, buttons are referred to as left, middle, right as seen when viewing chronometer front as seen in the image at left.
Read through the following instructions once before starting out.
When involved with setting the device, there is no reason to rush. It will not leave the setup process until completed.
If these instructions seem long, they are offered with the goal of avoiding frustration. Multiple buttons that change settings mysteriously when pushed, can lead to frustration.
So these instructions are presented to avoid that.
Skip to the heading that’s needed if one just needs a reminder.
SET TIME & DATE & DAY OF WEEK
In what follows, if one holds down the right button while selecting values,
the values scroll more rapidly. Otherwise, one short push advances one value.
Let's set these up.
Press middle button quickly, 3 times Result: Hours, Minutes, flashing Seconds displays.
Press right button once. Result: Seconds reset to '00' and continue to flash.
Once seconds have been set,
Press left button once. Result: Minutes flash current value.
Check actual time with another device.
Press (or hold to scroll rapidly) right button. Result: Minutes advance.
Once minutes set,
Press left button once. Result: Hours flash current value.
Notice that next to the flashing Hours value is a letter ‘A’.
It is possible to set the device to 12-hour or 24-hour time display.
Press left button once or repeatedly, and the ‘A’ displays for AM.
If left button pressed 12 times, the ‘A’ changes to a ‘P’ for PM.
If one presses the left button 12 more times, the ‘P’ changes to an ‘H’
for hours of the day, and the device is then in 24 hour time display.
So if one is setting the device at 5 in the afternoon, press the left
button until 17H appears.
Once the Hour and time display format have been set,
Press the left button, and setup continues.
Notice a small horizontal line flashing at the top of the display.
It is a bit difficult to read, but above this is a line of abbreviations of days of the week, in blue. These start with ‘Sun’ for first day of week being Sunday.
Press the right button. Result: Day Of Week advances one day.
Continue pressing the right button until the correct day is reached.
Once Time and date have been set,
Press middle button once. Result: Chronometer exits setup process and shows Current Time and Day Of Week.
TO DISPLAY THE DATE
With the Current Time and Day Of Week Displayed, press and hold down the
right button. Result: Date is displayed as Month & Day Date.
Also written in very small on the right of the display is ‘Date’.
Release the right button. Result: Current Time is again displayed.
SET an ALARM Time
Start with the display showing current time, not the stopwatch.
Press middle button twice, rapidly. Result: Alarm time flashes the Hours value. If device has been previously set to 12 or 24 hour time, that choice is applied in etting the Alarm.
Press right button once. Result: Hours value for Alarm advances one hour.
Once desired Alarm Hours has been set,
Press left button. Result: Alarm Minutes are flashing.
Press left button until desired Alarm Minutes have been selected.
(Recall that if one holds down the right button, it scrolls more rapidly which
may be of use in setting up more rapidly).
Press middle button. Result: Display switches back to Current Time and Day Of Week.
NOTICE ALSO: Having decided on an alarm time and entered it, the display now shows in addition to Time and Day Of Week, a symbol in the right upper part of the display. This indicates that the Alarm is turned on, and will sound at the next time it has been set for.
TO TURN ALARM ON & OFF
Press left & right buttons simultaneously and quickly. Result: the Alarm symbol disappears, indicating the Alarm is OFF.
Press the two buttons again in the same manner. Result: It toggles between Alarm ON and Alarm OFF.
TO DISPLAY ALARM SETTING
Press and hold down the left & right buttons simulatneously. Result: The Alarm Time that is currently set is displayed. This also turns the Alarm ON if it was off, and calls attention to that with a 'beep'.
THE LAP TIMER
It is unlikely that you will be doing laps during the study’s Walking Test.
Then again, one never knows!
Here is how the Lap Timer works:
Press middle button once. Result: the stopwatch displays ‘0:00oo’
Press right button once. Result: the stopwatch starts counting up.
At end of a lap or other repeating event to be timed,
press the left button. Result: The display stops counting up and shows a counted time. Without being able to see it, the stopwatch is still counting up.
Press left button once. Result: The display switches back to the stopwatch that was still running. So the display is now continuing to count up from when the stopwatch was first started. Think of this as a Total Time Counted.
Press left button again, once. Result: The display stops counting. It displays the
Total Time that had been counted up to this third push of the left button.
Example: Used to compare two laps run by the same runner.
Press right button as runner starts. Result: Stopwatch starts counting up.
As the runner passes before you at end of first lap, do this:
Press left button, then immediately press right button. Result: Duration of first lap is displayed. Remember this value, or write it down if needed.
As runner arrives to end second lap, do this:
Press left button. Result: Duration of second lap is displayed.
Finally, press left button a final time to reset the stopwatch to zero.
AND REMEMBER IF YOU GET LOST
It has a small but functional compass on its front to help you find your way home!
--------
All nice to know, but for the purposes of this study ...
Middle buttton: Use it with a very quick push to switch from clock time to stopwatch.
(If you hold the middle button down for too long, other things will display).
Right button: Start and stop the stopwatch.
Left button: With display in stopwatch mode and stopped, it resets stopwatch to zero.
Utility in this study ...
To take Vital Signs at specific intervals. (But first, see below. You may prefer the Countdown Timer for this purpose. You decide).
Use it to start from zero (right button) immediately after the Walking Test. Then take Vital Signs without further delay.
Notice when it has counted up to 5, 10 and 15 minutes. Take Vital Signs again at each of these times. But realize that it doesn't beep at those times, so stay vigilant.
Use it to time the duration of the Mental Status Questionnaire. (Here it does the job well. Use it).
In Stopwatch mode, start it (right button) as you read the first question.
Stop it (same right button) after answering the last question.
Note the total time elapsed, and enter that value at end of the questionnaire in space provided.
Then reset the stopwatch (left button).
That keeps it simple!
-------
The Countdown Timer
This too is pretty simple.
And actually, we mention in passing that this is also a count UP timer as well!
If it's displaying 0:00 and one presses the Stop/Start button, it starts counting up.
You'll be using it as described below, to count down.
To save battery life, the display is usually blank. Any button pushed turns it on.
Reset: press the Min and Sec buttons simultaneously, and MIN 00 and SEC 00 appear.
Suggested use:
Press MIN button 5 times and 5 MIN and 00 SEC displays.
To start counting down to 0, press the Stop/Start button on the right.
MIN and SEC flash on top and the time counts down.
It counts down to 0 and beeps. Four little chirps, repeated at 1 second intervals.
Press Stop/Start and the chirps stop.
But notice: the previous 5 minute setting is still there, ready to go and time down again
with the next push of the Stop/Start button.
Use:
On "Full Study" Days 1, 11, 21, 31:
Set it to 5 minutes
When ready, start it counting down and rest 5 minutes, seated in front of the vital signs
stand and its equipment. Five measured minutes of rest. No jumping up for the phone at 2 minutes and 34 seconds! If that happens start the rest period over.
Then take the vital signs at rest as instructed elsewhere.
But always "vital signs" = Oral Temp (°C) with the no touch thermometer pointed inside an open mouth (not at your forehead like in the News), the spO2 (saturation) with the pulse oximeter, the Systolic and Diastolic blood pressure (mmHg) with the wrist cuff, while holding on to the vital signs stand. And note the Heart Rate or Pulse (bpm), also from the wrist cuff. Write these values down. Later, send them off with your Study ID# and your Day Number from the Participant's Calendar to Vitals@StudyLTCovid.com. Forget either the ID Number or Day Number, and all your numbers become orphans.
Next, leave the Countdown Timer on its stand (it has a magnet on the back, and sticks to a nail at the base of the stand), and leave it set for 5 minutes.
Do the 6 minute Walking Test, described elsewhere on this site.
Prepare to find yourself right next to the vital signs stand at the end of the walking test, not out in the yard.
When the Walking Test ends, do the following, in order:
-
- Push the Countdown Timer's Stop/Start button. Have a seat in front of the vital signs stand and
- place hand in correct position on the stand and take the 0 minute vital signs (all the same as at the previous 5 minutes "at rest" readings). Do this right away after marching around. NOT in 10 minutes after making a cup of tea.
- With one hand, start the wrist cuff measurement by pressing it's Start/ Stop middle button. Get very still. Breathe perhaps 3 slow gentle breaths during its measurement.
- With the other, check oral temperature (I hold it backwards and use my thumb on the 'trigger').
- With the third hand ?... oops! The pulse ox is already on your index finger of the blood pressure hand, so press its button and note its reading when stable. If it's reading seems upside down, press it's button again once.
- Stay seated and at rest. You can read. You can review what you wrote down: oral temp °C, oxygen saturation %, Systolic/ diastolic blood pressure mmHg, Pulse rate bpm, Study ID#, study Day Number.
- Notice that the 5 minutes post exercise reading is coming up perhaps sooner than you would have anticipated on the timer.
- When the Countdown Timer chirps, press its Stop/Start button to stop the chirping. Press it immediately, a second time. It's again counting down from 5 minutes.
- You are now at 5 minutes post walking test. Do steps 2 through 8 above, exactly like before.
- Next chirps... You are now at 10 minutes post walking test. Do steps 2 though 8 above, exactly like before.
- Next chirps... You are now at 15 minutes post walking test. Do steps 2 through 8 above, exactly like before.
- You are done with these measurements on this, Day ___, of the study.
- Send in your results by email, before you forget. Vitals@StudyLTCovid.com As explained elsewhere, this can be a written out note, or exchanging an Excel file, but taking a legible photo of the provided Measurements Record and sending that image in works fine as well. Name the photo: Study ID#_____ Day Number ____. Confirm all numbers are legible.
- At your preferred time, do the intervention with light as explained elsewhere.
All of this may seem like you are doing only two things for 15 minutes after walking around:
-
- Resting
- Measuring and writing down numbers.
But you are actually doing a third thing. You are recovering from a very mild physical test.
Perhaps not so mild if COVID-19 has you all tired out much of the time.
So your body may be doing many things, not just resting, writing, and finding calm after the effort. That's called recovery. Your vital signs will teach us a great deal about that recovery.
No, you are not recovering from a half-marathon. But for some, it may seem like it.
On other days: (2-10, 12-20, 22-30)
No marching test, and no repeated 5 minute intervals of vital signs.
Essentially you are getting the same above data, but only 1 time each day.
We at Study Central suggest doing this first thing in the morning soon after arising, and before breakfast, hot beverages, or any exercise.
So on those days, Countdown Timer use looks like this.
-
- Set up the equipment if its been moved around. Place BP cuff on wrist, pulse ox on index finger, Vital Signs Stand in front of you, thermometer, measurements page and marker nearby.
- Sit down and confirm the Countdown Timer is set up for 5 minutes.
- Start the measured 5 minutes period of rest. Resist the effort to jump up if you forgot something. If you did, start the 5 minutes of measured rest once again.
- When the timer beeps, press its Stop/Start button, and do the vital signs measurements as detailed above.
- Send the measurements as described above with your Study ID#, and the study Day Number, to Vitals@StudyLTCovid.com.
- You're done with measurements for this day.
- At your preferred time, do the intervention with light as explained elsewhere.
If on certain days, this study process seems to be getting long or monotonous, remember that "long-term" COVID-19 lasts an average of 6.6 months. If not for yourself, do it for all the others. It's only 31 days; a third of which are rest days.
----------
Finally, before leaving this page, read again steps 1 -> 8 above. When your equipment arrives, declare a "Day 0" and go through those steps physically to get used to the process. Do this before actually starting your "Day 1" of the protocol on the Participant's Calendar.
When you are done with your participation in this study, and once this plague is behind us all, you can volunteer in a hospital to take vital signs. No one will do it better than you.
-------
<<<< Back to the Index to DEMOS page (explains other equipment)
A découvrir aussi
- The Pulse Oximeter
- INDEX to DEMOS and Instructional material
- The Blood Pressure and Pulse, Wrist Cuff Device