
"Quick Impressions" Subgroup
Quick Impressions - Day 0
StudyLTCOVID.com
Thanks for visiting!
To translate this page, select your
language from the dropdown menu below:
This page serves to organize the "Quick Impressions" process.
What is that?
Several people have expressed an interest in trying out the device we use for our intervention with light as described elsewhere on this site. Their feedback to our outreach is that they'd like to give it a try: to get an impression.
Wonderful!
At present, to those showing this interest, we will send the material.
How to get the same material in the future may change, as thousands line up to look a gift horse in the mouth.
In exchange, and founded in a continued dedication to having observations that can be subjected to statistical control, we'd like to gather a little bit of data.
This as painlessly as possible.
Discretely: Respecting personal privacy issues, while not getting confused about who is providing impressions or feeding back data.
Nothing too heavy or too time consuming.
Linked to fit in with what we have already learned.
Which is?
That the intervention seems safe (consistent with reports in the literature x 40 years).
That participants have a positive response to this intervention applied over time.
If we can't chat over coffee ( or anything else), why not ZOOM (or Skype or Signal or ...)
Follow-up, Q&A sessions, discussion of results, will (as per present plan, which is flexible), happen via ZOOM meetings. Scheduling for people located around the world, (and who are doing other things besides helping out with this study) invites complication. So to avoid such meetings at middle of the night hours, many such different meetings may be required. Their format will remain "quick and easy," rather than "all inclusive, time-consuming, massive presentations to thousands." Just one other person in the next meeting? That's fine.
Meetings will serve to explain the choice of tests we'd like to do (and proposed below).
Meetings will serve to listen to feedback from "Quick Impressions" participants.
Working at a distance means that many tests done with participants where we are located will be omitted (so don't get anxious, but also don't start feeling left out).
Goal:
- The 'Quick Impressions' participant gets just that: an impression of the impact of this intervention with specific wavelengths of light, on their condition. They'll be the final judge.
- What "condition"? Their daily life with the sequelae of "long-term" COVID-19.
- To gather observations that allow useful assessment of this "Quick Impression" in addition to that subjective opinion. I value both highly.
- Both the more complete and this "Quick Impressions" component have the same goal: to identify individuals with "long-term" COVID-19 and study scientifically/ statistically whether a specific intervention with light helps. You may see this intervention with light under the names Low Level Light Therapy (LLLT) or PhotoBioModulation (PBM). Want more info? OK, I've covered that starting here.
- We observe a very present tendency in Medicine towards metanalyses and obsessing over gathering huge numbers of participants. "How big is your 'n' ?" That has its pluses and minuses that we won't explore here. Since many years we have applied and had confidence in Small Group Statistical Methods. If well done, as developed by those with names like W. Edwards Deming, it gets the job done quite well, even if 40 participants doesn't sound as sexy as 68,224.
Starters:
- This site (in fact, this page and another), will give descriptions & links to the different tests to move things along.
- As you have learned, these pages have an entry password to avoid mixing things up with other components of the StudyLTCOVID.com work.
- "Quick Impression" participants get an ID assigned to clearly identify their responses. That ID is actually self-assigned and looks like this: QI- + initials + year of birth. So mine would look like: QI-WJO-1950. This gets used when a test below asks you for your "Study ID#". Really not very challenging I don't think. In the larger study, these numbers are assigned as part of a randomization process that we won't get into for "Quick Impressions."
- The protocol is pretty simple:
- The plan is to use the lights for 10 days straight and as described.
- "as described" means that for some, the 'target' is the Head for 10 minutes each day x 10 days. For others, the 'target(s)' are Head x 10 minutes AND Back x 10 minutes each day x the same 10 days. The goal (as in the larger study) is to see if more skin surface area exposed makes a difference to all those mitochondria floating by in White Blood Cells and others. Participants can express a preference. If really not much time available for all of this, 10 minutes/ day is quicker than 20 minutes/ day. In the larger study, this is of course randomized. What the participants "live" in that larger study can be seen on the Participant's Calendar found here if interested.
- "as described" also means knowing what to do with these lights. That has been covered in this article. Whether one holds the lamp holder (doesn't get hot) in one's hand and moves that around one's head, or fixes the light in a stable fashion and moves in front of it, probably doesn't matter. As long as one is close enough to the lights emitting surface, and not sitting across the room from the light or even 1 foot away. Stay close to it.
- Day 0 - one does some tests as presented below.
- Day 1 - start of the 10 days in a row of the light intervention (and start of forming one's "Quick Impression.")
- Day 10 - last day of light intervention.
- If one misses a day, (or 6 !) add those back at the end.
- So it really is 10 days of light, and not, for example, 4 interventions accomplished during 10 consecutive calendar days, with 6 missed days. If you miss, don't start over. Just pick it back up until you've done 10 days.
- Day 11 - a repeat of the Day 0 tests. I will put all of that for Day 11 with links on another page to avoid cluttering things up here. I'll put a link at the bottom of this page to get there once that is ready. That page will also use the same password as this one.
- Day Whenever - a Zoom meeting or equivalent to present and talk over how it went: both "Quick Impressions" and available objective data.
- The plan is to use the lights for 10 days straight and as described.
"Yes but, ... I already have a question."
- Bring your question to a Zoom meeting. Sending out meeting invites of course requires my having your email address: Used only for the purposes presented here.
- "My cousin Josephine is interested. Can she come to the meeting?"
- Sure. Bring Jo along. Or send her the link or my email address to get one.
- Are you a medical doctor?
- You bet. You like Bio's? Here's mine.
- So I'm retired and still attracted (as in the past) to ONPWR.
- (that's Only Nobel Prize-Winning Research)
- But let's be clear. Sending out lights to people around the world does not mean that I have a license to practice Medicine in Scotland, nor New Jersey, nor anywhere else. So your involvement means that we will work together to see if this light intervention appears to have positive effects or not. If you want to bow out, do so at any time. If I didn't think it was safe, you wouldn't be reading this now nor awaiting delivery of your lamp. The usual silly phrases about my not being responsible for any untoward effects of your participation may still apply, but I prefer friendlier exchanges. We'll get an Informed Consent form to you at some point. Read it, asks questions as you feel indicated, sign it and send it back as a scan or whatever. Then everyone concerned will feel warm and protected.
- "When will that ZOOM meeting take place?" As I write, to overcome middle of the night participation, probably two this Tuesday, February 7, at 10:30AM Central European Time (CET) here in Belgium, and again at 17:00 to 18:00 my time for those on the East Coast USA, (11AM for them) for example. I'll send out ZOOM invites to those who have shown interest, but here is the ZOOM Meeting(s) info below...
- (These links below for our ZOOM meeting are now obsolete. I left them to give some idea of what that process looks like for those who don't know).
- 1st session at 10:30AM CET Join Zoom Meeting https://us02web.zoom.us/j/87041354660?pwd=ZTBISGhQbkM1TWtpcWpaVmtzNStkUT09 Meeting ID: 870 4135 4660 Passcode: 018404
- and 2nd session at 5PM CET Join Zoom Meeting https://us02web.zoom.us/j/81947129920?pwd=SjliYUk1eXl1UGtMdHVpTm9OcmF0Zz09 Meeting ID: 819 4712 9920 Passcode: 271082
----------
Day 0 Work.
Let's get started.
When I questioned back in August to November of 2020, people with "long-term" COVID-19 had been sick on average about 6.6 months. When I asked about Illness Duration more recently, overall it was 24.82±9.43 months. Those who responded that their illness was no longer present, had been sick 13.99±5.26 months.
Perhaps you already answered that illness duration online survey?
Then skip this first link below.
If not among the responders yet, please click the b. link below and give your answer(s). This won't reappear on Day 11 of course.
a. If you already answered, here is a link to see a dashboard of some results.
b. If not, here is a link to quickly take the Duration of Illness survey. And look at the Dashboard later.
Why all the fuss about this?
Because the world has yet to understand and buy into the fact that this little problem is lasting 25 months or so in many who have it. More than just a little nuisance for a week or two.
Below are some propsed tests. But first, any such pursuit should begin with a History of Present Illness. Here is a page to help further our belief and your understanding that it's always the right place to start.
Test 1 - Signs and Symptoms Frequency (5 minutes)
If the intervention with light makes a difference, these may change (as we are seeing locally).
An important note: given all the to do about brain fog (not saying it isn't merited), how long a test takes you to complete is (I think) important data. So in what follows, a chronometer is frequently referred to. Endurance Athletes probably have several, but if not let me know and it will be in the box.
This is not a race where the shortest time over the course wins. Take your time as needed to respond well. But don't get up while the stopwatch runs on to go fix yourself a tuna fish sandwich or a cappuccino!
Here is the link to take TEST 1 now on Day 0.
-------
Test 2 - Trail Making Test (Parts A & B, 2 or 3 minutes)
A test originating from 1944 in the US Army, it still is quite effective.
How To Do This:
1. Print both TMT Part A and TMT Part B (or use the 4 pages provided for Day 0 & Day 11)
2. Starting with Part A, read the Instructions (see copy below)
3. Do the Sample by tracing from Begin to End.
4. Get Stopwatch ready
5. Start when ready, and click stopwatch
6. Once finished, click stopwatch
7. Enter duration.
The instructions as they appear on the test sheet look like this:
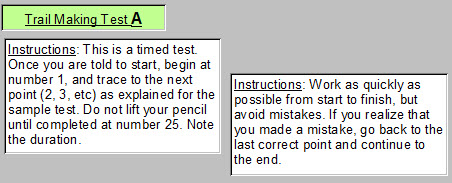
The results get compared with established norms in addition to comparing Day 0 and Day 11 results.
If there is a slight administrative challenge to getting this one done, it requires:
- Confirming you've got the paper forms and a pencil or pen to trace with,
- Making sure you're starting with TMT - Part A
- Having your stopwatch ready.
- Recalling throughout to not lift your pencil until your done at #25.
- Understanding that making an error along the way is no big deal, you just go back to the last correct spot and forge ahead.
- The key result is the time it took you to get to the end after stopping the stopwatch.
- Knowing what to do with the results to get them placed somewhere to be retrieved.
- Then doing the same with TMT - Part B which is a little trickier as you'll see.
For Number 7 - where to put the results ? ... is easy because on Day 0 you put them online in a tiny survey which you get to with this link. And on Day 11 there is another link to get to the right spot with another little survey that looks identical, but no need to go there now.
-------
Test 3 - Mental Status Exam (est. 8 minutes)
Most individuals with "long-term" COVID-19 have already lived through one or more negatives in contacts with the extant healthcare system. In some countries worse than others. But when one presents with an average of 16 physical symptoms and 7 emotional symptoms, the existing system was more often than not, quite blown away. So it took 2 years (and still waiting) to get an occasionally compassionate response.
"Just another anxious COVID patient" happened all too often.
The evolution of that initially disturbing setting has nevertheless included not just the acceptance of terms like "brain fog" as relating to real findings, but proof time again that the brain can be affected. From psychology to pathology, there are brain findings.
So does our intervention with a specific type of light help with this or not?
To find out, we'd like to compare a before and after Mental Status Exam, specifically tailored for this setting.
Nothing about doing this should be taken to assume that the author is simply biased against those with "long-term" COVID-19. Anything but that is true.
Then again, if one had had "brain fog" or other findings related to brain executive and other functions, who wouldn't get just a little bit crazy?
Here is the link to our online Mental Status Exam
Take it now. Do the 10 days to get your "Quick Impression," then you'll take it again on Day 11. Who knows? We might just learn something in working on this together. Here locally, many think we already have. Here's the link for Day 0 - MSE.
-------
Test 4 - Visual Acuity (est. 4 minutes)
There's a brilliant lady working in Australia, Melinda Fitzgerald. She's not only a physician, but also a physicist with knowledge of Optics that is hard to find an equal of. She's a specialist in Neurotrauma, the retina, and so much more. Here is not the place to expand on all of that.
Her results with effects of white light and red light are fascinating.
So why set up some method here for the "Quick Impressions" group to test Visual Acuity? Well, we do it with the larger group locally. And because the intervention invariably has illumination falling on even closed eyes, it gets to the retina. Unlike a tanning bed with UV irradiations, no eye protection is worn during our intervention. Simply closing one's eyes is more comfortable. When working around those doing the intervention, I don't turn away or wear blinders or dark glasses. Only positive impressions so far.
Here is a little background (a page on this site) to help put this in perspective.
And to get an idea of how this gets carried out for local participants, here is another article on this site.
For the "Quick Impressions" group, who all are at a distance, we'll apply similar tools.
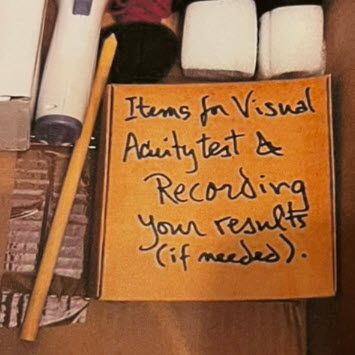
- Material that's required and its setup
- Eye chart (10ft Snellen) placed where light can fall on it
- Device to measure distance from chart (a string with a knot at each end is provided)
- Eye obturator (blocks the eye not being tested)
- Voice recording device (I use iPhone)
- Reminder to test with and without glasses where indicated
- Carrying out the test
- Getting in appropriate position
- Recording responses
- Sending response recording via email or messaging
- Entering responses in a specific database locally
So no online survey for this one.
But the material to pull this off (not the iPhone!) will get included with the intervention light.
Anyone using a computer, and especially if set up for ZOOM or other meetings or social networks, will usually have the required recording material on hand.
As mentioned, most smart phones today, have a recording app that can be used to send an audio recording via email.
And That's It for Day 0 !
On Day 11, a final very quick survey is added to the others to pursue possible effects and side-effects of this intervention, as experienced (or not) by "Quick Impressions" participants.
It already exists, and will next be converted to an online survey format, then linked to here.
The Day 0 interventions introduced above are repeated, looking for changes after the intervention.
What about physiology and lab work ?
Yes, some things are missing in this abridged "Quick Impressions" protocol.
To add more will result in having to delete the word "Quick" from that title.
And effectively and safely doing tilt tests, pulmonary, cardiac, metabolic and laboratory monitoring as in the locally applied protocol, just won't be where we're headed.
You'll all just have to come to Stavelot and stay for a month or so.
If I have an eagerness to add more, I would probably select a peripheral blood smear,
fixed and sent off for subsequent staining, as a very valuable 'Test 5.' It could be done
Day 0 and Day 11. It could be done before and after a 6 minute walking test. It usually
provides a great deal of information. How to make that happen is another question.
It is certainly doable, even at a distance.
And if you in fact did the Vital Signs before and after the 6 Minute Walking Test on Day 0 and Day 11, here is the link for reporting those Vital Signs results.
To get at brain issues that impact attention and reaction times, I also have a 3 minute test for that which is quite handy. "Brain fog" of course translates into problems with both attention and speed of reaction. The subject views a video with stopwatch in hand, and sends off the two results via email. A very short online survey can also be used to speedily gather the results.
One can view the test at this link.
Below is what that looks like...
Already lost ?
Let me resume.
- Some participants only speak French. This test and others are covered here for them.
- The process is: some tests before (Day 0), 10 days of intervention with light, the same tests afterwards (Day 11).
- For this test of Attention and Reaction Time (in English),
- view the video on Day 0 at this link.
- then report your results using the online survey for Day 0 results, linked to below.
- view the video on Day 11 at this link
- then report your results using the online survey for Day 11 linked to below.
- view the video on Day 0 at this link.
The "Day 0" online survey is at this link.
The "Day 11" online survey is at this link. One of course can't answer these without first taking the test as presented above. Combining the video with a spot for online responses should make such a test quite time efficient.
In all of these "just a few more" potential tests, the goal is to take "Quick Impressions" beyond subjectivity to include some added objective measures. Testimonials are used to sell many things.
Testimonies don't all stand up very well to closer inspection. Investing time, effort and expense in an intervention, prompts one to try and get everything possible out of it. The return on investment here, should be good information, with all that that means.
And in the present work, that means defining the effectiveness (or lack thereof) of an intervention with light for those with "long-term" COVID-19.
So if you're ready to start your "Day 0" process, use this quick survey to enroll as a participant in our "Quick Impressions" protocol.
"Quick Impressions" CONTROL Subgroup - DAY 0 and DAY 11 envelopes
Si besoin, voici un traducteur ci-dessous:
StudyLTCOVID.com
Thanks for visiting!
To translate this page, select your
language from the dropdown menu below:
A "Quick Impressions" CONTROL participant gets (along with everything else in the box!), two envelopes.
The CONTROL group provides comparisons with results of participants carrying out an intervention with red (660-670nm) and near-infrared (830-850nm) light.
The basis of the "Quick Impressions" protocol is to do some tests, carry out a 10 day intervention with light (photobiomodulation) and repeat the tests, looking for any changes.
Clearly, those in this CONTROL group do not carry out the intervention with light.
But they do carry out certain tests that provide comparisons with the results from the intervention group.
But which tests? And carried out how? And using what equipment?
This is fully introduced in a PDF document found at this link. Also, as a WORD document.
The document is also included in each "Day 0" and "Day 11" envelope found in the box of materials provided to a CONTROL subgroup participant.
And to simplify your entry as a participant in the "Quick Impressions" study protocol as a Control subject, start by completing this survey which is pretty much self-explanatory.
DAY 0 and DAY 11.
The above linked to introduction (4 pages) should be adequate to permit below, an efficient presentation of required links for reporting each test done. They are reported using different surveys for each of the two days (0 or 11). The aim is to avoid mixing results.
The CONTROL subgroup will be doing:
-
-
- Test 1 - Signs and Symptoms Frequency
- Test 2 - Trail Making Test A & B
- Test 3 - Mental Status Exam
- Test 4 - Visual Acuity Test (OMITTED in the CONTROL Subgroup)
- Test 5 - Attention & Reaction Time Test
- Test 6 - 6 Minute Walking Test (6'WT) with
-
- Vital Signs (VS) at "Pre", Time 0, 5, 10, 15 minutes (Vital Signs Sheet included)
- VS = oral temp with infrared thermometer, spO2 with pulse oximeter, BP systolic, BP diastolic & pulse.
- Finger stick and peripheral smear preparation at "Pre" and again at 15 minutes after the end of the 6'WT.
- In envelope "Day 0" is a form for writing down Vital Signs measurements. There are enough lines on the form to do "Day 11" as well. Eventually, you can scan or photograph your completed forms, and I will transfer your measurements to the database we use for that.
- Even easier: use this online survey to report your Vital Signs for Day 0, Day 11, or for both days.
- Again, use the equipment provided even if you have better !
- Again, use the Vital Signs Stand to keep the blood pressure cuff at a constant relationship with your heart. Not complicated, and a page to explain the "How To's" is on this site at this page.
- Vital Signs (VS) at "Pre", Time 0, 5, 10, 15 minutes (Vital Signs Sheet included)
-
-
NOT in the envelope but given here are copies of all the links to these and as already found in the Day 0 introductory article.
The surveys ask for your Study ID#. For those in the CONTROL group, that looks like this:
QIc-WJO-1950 which means Quick Impressions control - initials or a pseudonym - Year of Birth. Remember the "c" after the "QI". Those not in the intervention group use only QI-xx-19xx. So the "c" should allow correct identification of participants in the Control subgroup.
Certain survey questions may address subjects for those with "long-term" COVID-19 who are also doing the intervention with light. If in the Control group, simply skip these.
Here are those links once again: Important to recall that even though the tests on Day 0 and Day 11 are usually identical, their results are reported online at different links. So first in what follows, is for ...
DAY 0:
- Test 1 - Signs and Symptoms Frequency. Here is the link to take TEST 1 now on Day 0.
- Test 2 - Trail Making Test A & B
- Print forms if needed: TMT Part A and TMT Part B They are also included in each "Day 0" and "Day 11" envelope that came in your box.
- Place your results online at this link.
- Test 3 - Mental Status Exam Here is the link to take the MSE online on Day 0.
- Test 4 - Visual Acuity - skip this if in the Control group.
- Test 5 - Attention & Reaction Time Test - You need the provided stopwatch. The video that explains the test, also administers it. It is found on Youtube at this link. https://youtu.be/LwWZdhICf0o Your responses (there are only two to give) are given online at https://www.surveymonkey.com/r/Z78C5P2 or click this link.
- Test 6 - 6 Minute Walking Test, with tests before and after.
- Vital Signs using supplied equipment at rest ("Pre") then at 0, 5, 10, 15 minutes.
- You may have the required equipment (or better !) but we like the idea that everyone is using the same equipment for Vital Signs measurements. Especially, for the blood pressure measurements, using the supplied stand keeps things very consistent. Report your results using the supplied form, with a picture emailed to Vitals@StudyLTCovid.com, or perhaps faster: this online survey format for Vital Signs.
- One finger stick and preparation of a blood smear at "Pre" (at rest before exercise).
- This link presents a video explaining in great detail how to do the peripheral smear. That video is also embedded at the bottom of this page for convenience.
- One finger stick and preparation of a blood smear at 15 minutes after exercise.
- Both are sent as soon as possible after their preparation to the address already written on the 'Day 0' envelope supplied in the box. Wrap the glass slides in the 3 "click together" plastic shipping boxes (top one is empty), wrapped as you received them. They're labelled to avoid error.
- Vital Signs using supplied equipment at rest ("Pre") then at 0, 5, 10, 15 minutes.
How could the 6 Minute Walking Test get messed up?
-
-
- If you're not marching at the same pace as other participants.
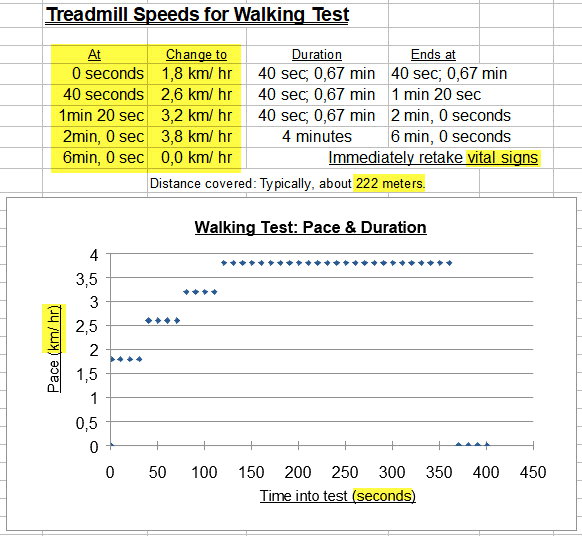
- If you have a treadmill, but don't have the speeds/ durations and when they change listed in front of you on the treadmill. (see below)
- If you don't have a CD player (they're old fashioned now, didn't you know?) to play the CD that is in your box that was sent you.
- You go up and down steps to prove something. Don't. Just stay on the same level.
- You forget that after the 6 minutes are done, you take Vital Signs at 0 (immediately!), 5, 10 and 15 minutes. (Example: You got a little exercise for 6 minutes. Then you went and made some coffee and called a friend. The study gets no data).
- You never reported the your results. Use this online survey to report your Vital Signs.
- Some other unforeseen tragedy or disaster.
-
So here is a link that will play the 6 Minute Walking Test through your computer's speakers.
While it gives prompts in English, following the drum beat gives the correct pace and changes in speed. This recording also refers to final Vital Signs at 0, 5, 10 minutes. But for those in the "Quick Impressions" protocol and Controls, we add 15 minutes, at rest after marching around.
And if you have a treadmill, and you (or even better someone else) can make the speed increases at the appropriate times, below are those intervals. The pace is rather slow, especially for an endurance athlete. But with "long-term" COVID-19 aboard, anything is possible. Remember, if you feel like passing out, sit down and stop all this nonsense! (But do quickly take your Vital Signs if you're still conscious !).
Once again, the Protocol for CONTROLS is explained here if you'd like to print it.
-------------
Next, links for ...
DAY 11:
As noted above, the tests are identical, but the results are reported using a day-specific link.
In the CONTROL group? Remember the "c" in your Study ID# (QIc-Joe-1984).
- Test 1 - Signs and Symptoms Frequency. Here is the link to take TEST 1 now on Day 11.
- Test 2 - Trail Making Test A & B
- Print forms if needed: TMT Part A and TMT Part B (I placed these in your Day 11 envelope, just in case). Remember to have the stopwatch handy to time start to finish.
- Place your results online at this link on Day 11.
- Test 3 - Mental Status Exam Here is the link to take the MSE onlinehttps://www.surveymonkey.com/r/76N2VWT on Day 11.
- Test 4 - Visual Acuity - Not done by the CONTROL group.
- Test 5 - Attention & Reaction Time Test - the video that explains the test, also administers it. The test for Day 11 is found on Youtube at this link. https://youtu.be/ffedNoOBFRk
- If you prefer, it is embedded below for direct use on Day 11.
- Your responses to the test (there are only two to give) are collected online at https://www.surveymonkey.com/r/J27WSPB or click this link.
- Test 6 - 6 Minute Walking Test, (6'WT) with tests before and after.
- Vital Signs using supplied equipment at rest ("Pre") then at 0, 5, 10, 15 minutes.
- You may have the required equipment (or better !) but we like the idea that everyone is using the same equipment. Especially, for blood pressure measurements, using the supplied stand keeps things very consistent.
- Send in your Vital Signs Results by online survey or a picture of your completed form to Vitals@StudyLTCovid.com
- One finger stick and preparation of a blood smear at "Pre" (at rest before exercise)
- One finger stick and preparation of a blood smear at 15 minutes after exercise.
- Both are sent as soon as possible after their preparation to the address already written on the 'Day 11' envelope supplied in the box. Wrap the glass slides in the 3 "click together" plastic shipping boxes, wrapped as you received them. They're labelled to avoid error.
- Vital Signs using supplied equipment at rest ("Pre") then at 0, 5, 10, 15 minutes.
- Day 11, Test 7 - That is a final survey to see how you and photobiomodulation (PBM) were able to get a long. That may seem silly, since in the CONTROL Group no intervention with light was carried out. Please take this anyway to see how much your last 10 days may have generated some responses, even without the light. Here is the link to the survey on your NON-intervention over 10 days with PBM.
The present page is found on the StudyLTCovid.com site at the following link:
https://www.studyltcovid.com/quick-impressions-day-0-and-day-11-envelopes-1
As mentioned, a copy of this page will be placed in both the Day 0 and Day 11 envelopes that you received. This paper page doesn't have functioning links of course!
So use this as a reminder, but go to the actual article online for the convenience of having everything for Tests and Results for the CONTROL subgroup be a simple click away.
And if you find that a link is broken or in error, please let us know.
-----------
The Peripheral Smear:
How to do it and what to do with the slides you prepare:
If you are fixing your slides at home after air-drying them, here is a very brief summary of how to do that.
If not done yet, have a look at this short survey to get you enrolled as a participant.
This helps to make things easier for you, and more manageable for us. Have a look. You'll understand we're sure. It saves us (and you) from asking and answering the same questions over and over again.
If you'd like a QR Code for access to this survey, here's one:

It will take you directly from your Smart Phone or PC to the survey to quickly register as a participant. Participants get registered. Whether as an LTC intervention subject, or a CONTROL, Participants Get Registered. Why? Well as we wrote above but you might have skipped over:
- This helps to make things easier for you, and more manageable for us.
- It saves us (and you) from asking and answering the same questions over and over again.
"Quick Impressions" - DAY 0 and DAY 11 envelopes
A "Quick Impressions" participant gets (along with everything else in the box!), two envelopes.
DAY 0 and DAY 11.
The goal of these is to:
- supply explanations and images where helpful. For example:
- "Light Stand - Constructed dimensions and a few comments" - it helps to convert some pieces of PVC found in the box, into a stable light stand. If you'd like to see it before yours arrives, click here.
- offer printed copies of the online tests, just in case ... But, to avoid having the test format (paper copy versus online) influence your performance and results, do try to do this online. The links are given below, and for both Day 0 & Day 11. Giving you the Trail Making Tests in your envelopes just saves you having to print them from the links provided below..
- For the Trail Making Tests A & B - printed pages in case your printer isn't working.
- A copy of the Snellen eye chart for use at 10 feet.
- A reminder sheet of the tests that are done on Day 0:
- Test 1 - Signs and Symptoms Frequency
- Test 2 - Trail Making Test A & B
- Test 3 - Mental Status Exam
- Test 4 - Visual Acuity Test (see this link for a "How To" for setting this up).
- Test 5 - Attention & Reaction Time Test
- Test 6 - 6 Minute Marching Test with
-
- Vital Signs (VS) at "Pre", Time 0, 5, 10, 15 minutes (Vital Signs Sheet included)
- VS = oral temp, spO2 with pulse oximeter, BP systolic, BP diastolic & pulse.
- Finger stick and peripheral smear preparation at "Pre" and again at 15 minutes after the end of the 6'WT.
- In envelope "Day 0" is a form for writing down Vital Signs measurements. There are enough lines on the form to do "Day 11" as well. Eventually, you can scan or photograph your completed forms, and I will transfer your measurements to the database we use for that. Or, use the online survey for this reporting of Vital Signs.
- Again, use the equipment provided even if you have better !
- Again, use the Vital Signs Stand to keep the blood pressure cuff at a constant relationship with your heart. Not complicated, and here is a page to explain the "How To's" is on this site at this page.
- Vital Signs (VS) at "Pre", Time 0, 5, 10, 15 minutes (Vital Signs Sheet included)
-
NOT in the envelope but given here are copies of all the links to these and as already found in the Day 0 introductory article.
Here are those links once again: Important to recall that even though the tests on Day 0 and Day 11 are identical, their results are reported online at different links. So first in what follows, is for ...
DAY 0:
- Test 1 - Signs and Symptoms Frequency. Here is the link to take TEST 1 now on Day 0.
- Test 2 - Trail Making Test A & B
- Print forms if needed: TMT Part A and TMT Part B
- Place your results online at this link.
- Test 3 - Mental Status Exam Here is the link to take the MSE online on Day 0.
- Test 4 - Visual Acuity - requires setting up and performing the test as described before.
- You make a slow and distinct MP3 recording during the test.
- You send that recording file to Vision@StudyLTCovid.com or my personal email.
- Test 5 - Attention & Reaction Time Test - the video that explains the test, also administers it. It is found on Youtube at this link. https://youtu.be/LwWZdhICf0o It is already embedded immediately below. You can follow the above link, or click the video below:
- Your Attention & Reaction Time test responses (there are only two to give) are given online at https://www.surveymonkey.com/r/Z78C5P2 or click this link.
- Test 6 - 6 Minute Walking Test, with tests before and after.
- Vital Signs using supplied equipment at rest ("Pre") then at 0, 5, 10, 15 minutes.
- You may have the required equipment (or better !) but we like the idea that everyone is using the same equipment for Vital Signs measurements. Especially, for the blood pressure measurements, using the supplied stand (not the same as the one for the light) keeps things very consistent.
- Report Vital Signs Results at this link. It's pretty convenient.
- One finger stick and preparation of a blood smear at "Pre" (at rest before exercise)
- One finger stick and preparation of a blood smear at 15 minutes after exercise.
- Both are sent as soon as possible after their preparation to the address already written on the 'Day 11' envelope supplied in the box. Wrap the glass slides in the 3 "click together" plastic shipping boxes (top one is empty), wrapped as you received them. They're labelled to avoid error.
- Vital Signs using supplied equipment at rest ("Pre") then at 0, 5, 10, 15 minutes.
How could the 6 Minute Walking Test get messed up?
-
-
- If you're not marching at the same pace as other participants.
- If you have a treadmill, but the speeds/ durations and when they change listed in front of you on the treadmill is not being observed.
- If you don't have a CD player (they're old fashioned now, didn't you know?) to play the CD that is in your box that was sent you.
- You go up and down steps to prove something. Just stay on the same level.
- You forget that after the 6 minutes are done, you take Vital Signs at 0 (immediately!), 5, 10 and 15 minutes. (You got a little exercise. You went and made some coffee and called a friend. The study gets no data). You can report your Vital Signs after your tea or coffee at this link.
- Some other unforeseen tragedy or disaster.
-
So here is a link that will play the 6 Minute Walking Test through your computer's speakers. This recording also refers to final Vital Signs at 0, 5, 10 minutes. But for those in the "Quick Impressions" protocol, we add 15 minutes, at rest after marching around.
And if you have a treadmill, and you (or even better someone else) can make the speed increases at the appropriate times, below are those intervals. The pace is rather slow, especially for an endurance athlete. But with "long-term" COVID-19 aboard, anything is possible. Remember, if you feel like passing out, sit down and stop all this nonsense! (But do quickly take your Vital Signs if you're still conscious!).
The "Day 0" protocol is here in PDF if you'd like to print it.
-------------
Next, links for ...
DAY 11:
As noted above, the tests are identical, but the results are reported using a day-specific link.
- Test 1 - Signs and Symptoms Frequency. Here is the link to take TEST 1 now on Day 11.
- Test 2 - Trail Making Test A & B
- Print forms if needed: TMT Part A and TMT Part B (I placed these in your Day 11 envelope, just in case. Remember to have the stopwatch handy to time start to finish.
- Place your results online at this link on Day 11.
- Test 3 - Mental Status Exam Here is the link to take the MSE online on Day 11.
- Test 4 - Visual Acuity - requires setting up and performing the test as described before.
- You make a slow and distinct MP3 recording during the test.
- You send that recording file to Vision@StudyLTCovid.com or my personal email.
- Test 5 - Attention & Reaction Time Test - the video that explains the test, also administers it. It is found on Youtube at this link. It is also embedded here below for convenience.
- Your responses to Attention & Reaction Time (there are only two to give) are collected online at https://www.surveymonkey.com/r/J27WSPB or click this link.
- Test 6 - 6 Minute Walking Test, with tests before and after.
- Vital Signs using supplied equipment at rest ("Pre") then at 0, 5, 10, 15 minutes.
- You may have the required equipment (or better !) but we like the idea that everyone is using the same equipment. Especially, for blood pressure measurements, using the supplied stand keeps things very consistent.
- One finger stick and preparation of a blood smear at "Pre" (at rest before exercise)
- One finger stick and preparation of a blood smear at 15 minutes after exercise.
- Both are sent as soon as possible after their preparation to the address already written on the 'Day 11' envelope supplied in the box. Wrap the glass slides in the 3 "click together" plastic shipping boxes, wrapped as you received them. They're labelled to avoid error.
- Vital Signs using supplied equipment at rest ("Pre") then at 0, 5, 10, 15 minutes.
- Day 11, Test 7 - That is a final survey to see how you and photobiomodulation (PBM) were able to get a long. Here is the link to the survey on your intervention over 10 days with PBM.
This page is found on the StudyLTCovid.com site at the following link:
https://www.studyltcovid.com/quick-impressions-day-0-and-day-11-envelopes-1
As mentioned, a copy of this page will be placed in both the Day 0 and Day 11 envelopes that you received. This paper page doesn't have functioning links!
So use this as a reminder, but go to the actual article online for the convenience of having everything for Tests and Results, be a simple click away.
And if you find that a link is broken or in error, please let us know.
The "Day 11" protocol is here in PDF if you'd like to print it.
-----------
One can get into tests and results so far that one loses a bit of perspective.
Clearly what is more important are the 10 days that pass in between the two !
So let's finish here by bringing the light (red and near-infrared that is) to the front.
The above video has some information that is now dated. It reported: "Illness Duration of 'long--term' COVID-19 of 6.5 months." Well at present, in early 2023 that is more accurately 24.81±9.01 months.
That's a long time to be uncomfortable and fatigued. We'll keep trying here at this site to do something about that. The protocol presented in this article, is just one example of that.
Also, the video presents a light stand different from the one we put in the box and send out. That is less important. The "Quick Impressions" subgroup of our study is eager to provide their feedback. And we want to hear it.
Remember: It's about transmitting energy to where it is needed. E = h · nu
Those mitochondria have waiting long enough. (Since March, 2020 or before!)
Turn the lights on.
Adding to a "Quick Impression."
As some of you already know ...
Several individuals have been communicating about how to obtain a "Quick Impression" of the intervention with light presented elsewhere on this site, for "long-term" COVID-19.
The goal is to modify a longer protocol done here locally where I live, and already presented throughout this StudyLTCovid.com site.
Is it possible to do less than the full protocol, and still obtain a "Quick Impression" that is meaningful? Or perhaps better: an impression that is correct.
And for those guiding StudyLTCovid.com, "meaningful" or "correct" means the generation of findings that are amenable to objective analysis. To a process guided towards its conclusions by statistical control.
As individuals, we may get from time to time, a "hunch," an "impression" about how well something works for us. And we may very well decide, for personal reasons, and after assessing a situation with all information available to us, to simply "go with it."
There may be more pressure felt to simply "go with it," when other interventions have been tried, but with limited success.
But turning that personal result into a testimonial, or an affirmation of effectiveness to be shared with others, is a different story. What it lacks is control of the many variables that may be impacting any given situation in life: including illness and recovery.
Recovery from a fractured bone is a pretty well understood process.
Understanding recovery from "long-term" COVID-19 is still very much an "up in the air" or "anybody's guess" process. That uncertainty makes many 'providers' shy away, or even continue to pretend the problem doesn't exist.
"Quick" can still be informative
One goal for the reduced "Quick Impressions" protocol, is to derive meaning, while conserving Time and Energy for participants. (Money, is not a study issue for participants, though very much so for its organizers).
The tests to be done before and after a 10 day intervention with Red and Near-Infrared light were introduced in the article found at this link. We refer to that as Day 0 work.
Subsequent work, for comparison purposes is presented here, for Day 11. We still refer to it as work, because it is: Both for participants in the "Quick" study, and those gathering and processing the resulting data. That's the Time, Energy, and Money required to do any study.
Can the "Quick" protocol be made even more informative?
This article exists (of course) because we think so.
The above links present the "Quick" protocol as it exists (or existed let's say, at end of February 2023).
Now I'll suggest two additions:
-
- The Attention and Reaction Time Test. (Already presented at the bottom of the Day 0 page). What question does it try to address? Answer: "How bad is the brain fog and related deficits, and does an intervention with light help?"
- The test is ready to go.
- It's quick to do.
- It's results are entered by participants in a very short (2 question) survey.
- It is amenable to statistical control.
- While it is not thought of as a complete answer to the question, it supports other "puzzle pieces" that are already in place with the existing tests.
- The Attention and Reaction Time Test. (Already presented at the bottom of the Day 0 page). What question does it try to address? Answer: "How bad is the brain fog and related deficits, and does an intervention with light help?"
That one sounds like a Time, Energy, Money winner.
2. Here's another possible addition. Definitely less "Quick"
(and with additional Time, Energy, Money expenditures)
Participants are equipped to do the following:
-
- Rest 5 minutes than take Vital Signs and do a finger stick (like diabetics do) to obtain a blood sample for a "peripheral smear," as it is called in hematology.
- A specifically defined "6 Minute Walking Test" (with or without a treadmill) is next performed, with an emphasis on safe performance (not passing out on the floor).
- Subsequent Vital Signs are done at 0, 5, 10, 15 minutes after the Walking Test.
- Not too difficult since once again seated at rest, but does consume Time and attention to correctly make and capture measurement results.
- Results are noted and sent in via an online survey. Very quick.
- A second "finger poke" for a peripheral smear is done after the Walking Test. But done when?
- One could argue for: at 0 minutes (immediately after exercise)
- Another, soon after exercise (say, at 5 minutes).
- Another, soon after the 15 minute Vital Signs, when "rest" would have normally returned from a physiologic state.
- Hey wait! That would be a total of 4 "finger pokes"!
- And if proposed to happen as such, suddenly we're losing willing participants!
So here's the "Quick Impressions" version
- Get ready to do all of this.
- Material is provided to get it all done and keep measurements consistent.
- Get seated, and rest 5 timed minutes.
- Take and note Vital Signs at rest (on provided form or input your Vital Signs results online using this survey).
- "Vital Signs" = oral temperature (by Infra-Red thermometer), pulse oximetry for peripheral oxygen saturation, systolic and diastolic blood pressure, heart rate.
- Equipment provided and explained, to maintain uniformity of measurements.
- "Vital Signs" = oral temperature (by Infra-Red thermometer), pulse oximetry for peripheral oxygen saturation, systolic and diastolic blood pressure, heart rate.
- Poke finger. Prepare peripheral smear as instructed.
- Make sure its labelled with Study ID#, Date, "Pre-6'WT"
- Do the "6 Minute Walking Test." Quit if you feel like passing out.
- Immediately thereafter, get seated again to do Vital Signs at 0, 5, 10, 15 minutes.
- After Vital Signs completed, Poke finger a 2nd time and prepare 2nd peripheral smear.
- Make sure it's labelled with Study ID#, Date, "POST-6'WT"
- Provide "Vital Signs" data via online survey
- Send off the two labelled peripheral smears (as per instructions to follow).
So, should we add this to the "Quick Impressions" protocol (as it exists for Day 0 and Day 11 as we write this)?
What gains for the study ?
Objective data that gets much closer to issues of biologic state and response (to "long-term" COVID-19), than can survey responses that always remain more subjective.
-
- We like that
A Time, Energy, Money expenditure profile that is reasonable, and mostly already in place.
-
- We like that
So what do you think?
-
- Add "Attention & Reaction Time" Test
- Add "6 Minute Walking Test" with Vital Signs and 2 Finger Pokes
- Add #1. but not #2.
- Add #2. but not #1.
- Add both. Nice final additions to present protocol.
- Add neither. Leave present protocol alone.
Let us know by telling us what you think: "Questions@StudyLTCovid.com" or to
the personal email address that you already have.
And as usual: thanks for your attention and feedback.
UPDATE:
So the feedback was quite clearly in favor of adding both the
- Attention & Reaction Time Test, and
- The process of creating a peripheral blood smear and sending it in for staining & review.
- This sample is tied to a "6 Minute Walking Test" - either on a treadmill or marching to a recording that keeps time. (6'WT)
- Vital signs are obtained at rest, at 0, 5, 10, 15 minutes after the 6'WT. Reporting Vital Signs can happen online at this link.
- A "finger stick" to obtain a drop of blood and smear it correctly on a glass slide,
- at Time 0 and Time 15 minutes
- on both Day 0 and Day 11 for comparison. = 4 finger sticks in all.
- Should prove interesting and informative.
This of course requires materiel and administrative tasks.
In the box that a "Quick Impressions" participant will receive, are two envelopes labelled
DAY 0 and DAY 11.
Here's what's in each of those.
Unboxing
StudyLTCOVID.com
Thanks for visiting!
To translate this page, select your
language from the dropdown menu below:
Servez-vous du traducteur ci-dessus si besoin.
The Big Box Contents: the role of each item, and how to use, in the "Quick Impressions" protocol.

The goal here is to avoid surprises or confusion when you receive the material sent to you as a participant. While the content is described here below, related links are of course not in the box !
- Day 0 envelope - instructions for tests to be done Day 0 before starting the intervention with light.
While everything mentioned therein is available online at this StudyLTCovid.com site, printed copies of the Trail Making Tests, parts A & B, and the Mental Status Exam (if doing this in French) are in this envelope.
These, for convenience only since versions are found online. The Snellen eye chart is included.
- Day 11 envelope - instructions for tests to be done Day 11, after the 10 days of intervention with light have been completed. These paper sheets obviously do not contain working links, so use the links found on this site to find the page that presents the links to the tests and surveys used for reporting your results. The envelope also contains some convenience printouts. (e.g., Trail Making Tests copies). Links will be added on this page where they can help make things easier.
In the galleries that follow, if the speed of automatic presentation is not what you like, click the row of images at the bottom of each gallery, and select any image as desired.
- Box with LED light source and its holder (and UK adapter if needed). You'll notice that the lamp face has 9 'red' LEDs (660 to 670 nm) and 9 'near-infrared' LEDs (830 to 850 nm) when it's turned on. The latter are hard to see but are in fact on. In the middle, a 1.25 cm thick 'button' that serves as a reminder of the desired distance from the lamp during the intervention. One can move a bit further away (3 to 5 cm), but the energy transmitted (40 Jouls/ cm²) drops off quickly with longer separations from the lamp.
Why are these lamps number-coded ?
So we can track you down if you break one !
No, not really.
We use these codes to identify when a lamp was put in service.
We have found that if used every day for 20 minutes, at the end of 1 year a lamp has lost 8% of its power consumption. Different componets (resistances, diodes for instance) may eventually wear out.
That suggests a possible loss of 8% of its energy output.
Comparing interventions done with very old lamps with very new should therefore be avoided in a study like ours. That's just what we do currently.
---------
- Stability Stand for use with the light source (see gallery of images below)
- wooden base with attached PVC base
- a 40 mm diameter PVC pipe (the first upright) with an attached screw. A mark has been
placed on this pipe and its base, to more easily align them when placing the screw.
- a 30 mm diameter PVC pipe that fits inside the 40 mm pipe, and moves to adjust height.
It has an angle and a "T" at the top, with two screws in it.
These serve to stabilize the lamp's holding clamp (see images)
It has some black tape wrapped on it to reduce movement when placed within
the larger pipe.
- a 32 mm PVC clip is already on the 30 mm pipe. This can be used to slide up and down to
adjust the height of the LED lamp for the intervention for head and/ or back.
- a metallic spring clamp with red protective ends.
VERY IMPORTANT ! - it permits clamping the wooden base to
a shelf, desk or table corner to avoid crashing everything to the floor.
A LED lamp that has crashed to the floor will usually require major repair.
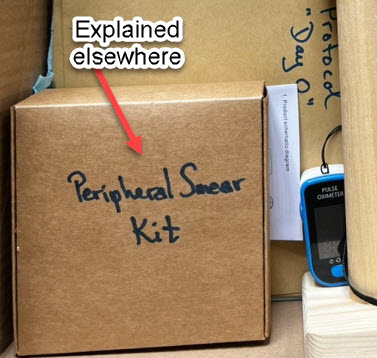
- a box labeled "Peripheral Smear Kit" whose contents and their use are covered elsewhere.
That page is linked to here: Peripheral Smear Kit.
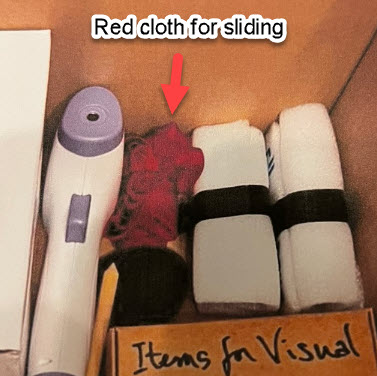
- a crumpled up red 50 cm diameter cloth circle.
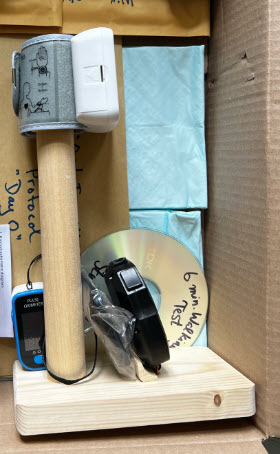
- a wooden stand with its base, a wooden upright, and rounded top where one grasps. In this image, the blood pressure cuff has been placed upon it, hiding the rounded top.
- a wrist blood pressure cuff is here atop the stand. It measures systolic and diastolic blood pressure and the pulse.
- a pulse oximeter. It measures peripheral oxygen saturation. You are probably quite familiar with this device now. This model has a button to start it measuring. It stops when measurements have been completed. The button also serves to invert the display while measuring, so numbers are easier to read, as needed. We usually hold the wooden stand top with 3 fingers and thumb, and extend the index to place the pulse oximeter. BP cuff just to the arm side of the wrist.
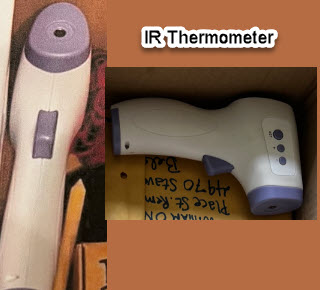
- an infrared thermometer. It measures surface temperature. As a reminder, we prefer to aim it at an open mouth rather than the forehead. Turn it around like seen on the left, and squeeze its button with your thumb. It beeps when done measuring.
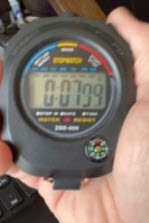
- a chronometer or stopwatch. Right button to start/ stop. Left button to reset. Middle button to switch from stopwatch mode to current time. It has a little wire loop at its base. The wooden stand has two little holes drilled in it to place the chronometer upright, using this bent copper wire. (See two images above this one).
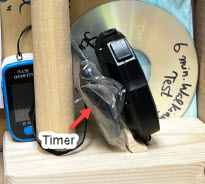
- a kitchen timer. This should be set to 5 minutes. When it counts down and rings, simply restart it for the next 5 minute interval. (Useful during 6 Minute Walking Test since Vital Signs are taken after 5 minutes rest, immediately after walking (Time 0), and at 5, 10, and 15 minutes thereafter. Each time, restart the timer to stay on target with the correct timed intervals, then proceed to take the Vital Signs.The timer has a magnet on its back. A nail that it sticks to, has been placed on the wooden stand to keep it handy.
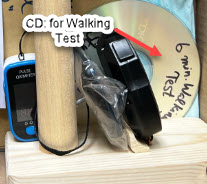
- a Compact Disc labeled "6 Minute Walking Test" which gives the pace when carrying out this part of the protocol. There are links to this on the site if you prefer or don't have a compact disk player. Copy it to whatever device is most convenient for you. Those with a treadmill and the pace information provided in the instruction sheets, don't need this.
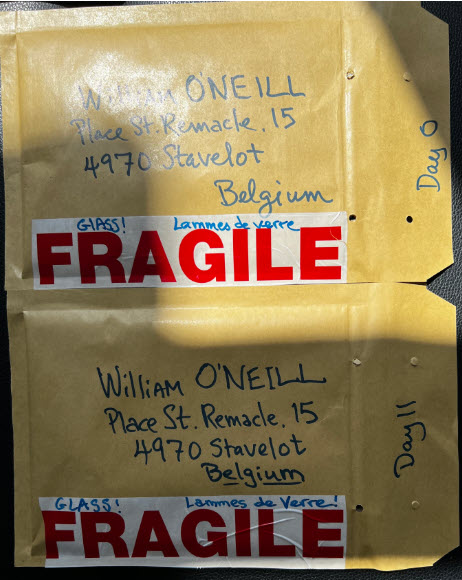
- two pre-addressed envelopes. These are used to mail back the completed peripheral smear slides in their plastic cases. (Two slides, Day 0; Two slides, Day 11; each day placed in 3 protective plastic cases for the slides. Then wrapped in the supplied foam to avoid broken glass during delivery. See these below.).
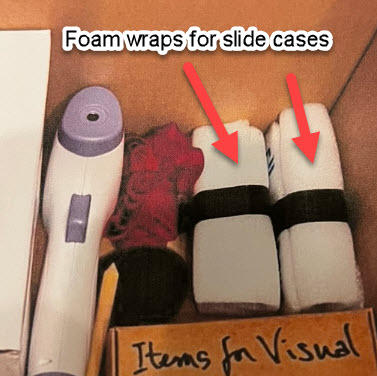
- two foam wrappers labeled 'Day 0' and 'Day 11'. These wrap around the plastic cases that hold the glass slides.
- So, slides get prepared (covered elsewhere);
- - get placed in plastic cases (covered elsewhere);
- - those get wrapped in these foam wraps shown at left (use electrical tape or other to keep them in place).
- - Then they are sent back (one wrap at a time) on Day 0 and again on Day 11 in the supplied envelopes shown above.
- If the postage is expensive let us know and we'll refund it.
- If based on weight, it shouldn't be expensive.
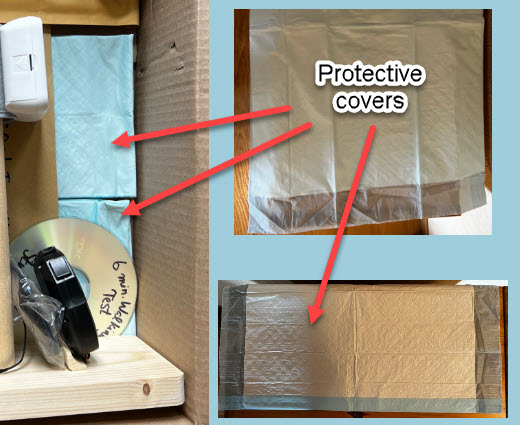
- two folded light blue protective items. Used to spread out and have a protective work surface to avoid spills and stains on your desk or table, on 'Day 0' and 'Day 11'. We used to call these "Chux" when working at the hospital, because once used, they were "chucked" away.
- The 6 items below are used to perform the Visual Acuity test that is part of the protocol.
Details of how to use these in doing that test are presented on the site.
- a lavaliere microphone (plugs into a SmartPhone).
- an adapter for a PC USB port if needed for the mic.: If using an app on PC to record.
- a string with a knot at each end to measure 3.05 meters or 10 feet
- a sticker to place on a wall or other surface to remind about this distance from the Snellen eye chart.
- a printout of the Snellen eye chart at 10 feet (since usually done at 20 feet).
- an eye obturator (black ellipse on a stick) to cover the eye not being tested (also fits under glasses). It's seen in this photograph at left.
>>> Peripheral Smear Kit - Box and Contents >>>