
Equipment
INDEX to DEMOS and Instructional material
StudyLTCOVID.com
Thanks for visiting!
To translate this page, select your
language from the dropdown menu below:
To help find what you are looking for, here is an Index of the several DEMOS and links to other instructional information.
The goal is to have readily available information on the equipment furnished for this study.
The more this is used to perform various measurements and interventions in a unified manner, the better will be the data emerging from study.
Much of this is very elementary. That doesn't matter. If information or suggestions are not necessary most of the time, when they are necessary, you'll find links here in this Index.
Like a User's Manual, links here should lead to explanations of "How To Do."
"When To Do" is covered elsewhere, with the Participant's Calendar.
-----------
Carrying out the Interventions
The LED lights that have been supplied
The Marching Test
Getting your results into the record (else, no study).
Measuring the effects of the Interventions
The Vital Signs Measurements
Fingerstick Blood Sampling
Visual Acuity Test - Equipment and Method
StudyLTCOVID.com
Thanks for visiting!
To translate this page, select your
language from the dropdown menu below:
Why to do a test of visual acuity in the setting of "long-term" COVID-19 has been
presented.
Usually, someone else is scoring the results of a visual acuity test.
In the present protocol, enrollees in the study are given a method and equipment for carrying out and reporting a test of visual acuity. This happens on study Days 1, 11, 21, 31.
Once set up for the test, it actually happens quite quickly and accurately.
As mentioned, one sets up for the test, does the test, recording it verbally in real time. One then sends in the recording to the email address given below.
The provided equipment
-
- A Snellen eye chart - this is placed on a wall or surface that is well lit. This one is desgined to be used at 10 feet (3.047 meters) from the observer. Our chart has been numbered (on the right side) to allow calculating a score. The usual Snellen values for visual acuity are given in the left margin.
- A piece of twine or light rope, with a knot at each end. These are premeasured and help to correctly measure the required distance of 10 feet. Once done, use the sticker mentioned below to indicate that same distance on each of the 4 test days.
- A printed sticker which serves as a reminder of the correct distance. It can be placed on the floor or on a wall or piece of furniture. It sticks on but can be easily removed when no longer needed. Leaving it in place for a month is ideal, so the distance to the eye chart is always the same.
- An eye obturator - (little stick with black cardboard) - used to cover the eye that is not being tested. It's size permits slipping it behind a pair of glasses. After an eye has been covered with the obturator, before testing that eye's vision, allow 10 to 20 seconds to pass so the eye can adjust before being tested.
- The following are provided to permit verbally recording the test in progress.
- a Lavalier microphone. Its use will free up a hand since one hand is already occupied with the eye obturator. It can be plugged into a smartphone or computer and software used to make the recording. Many apps are available. Choose one that permits sending the recording as an MP3. Email to Vision@StudyLTCovid.com It also has a port for connecting a headset for listening, but that should not be necessary. The idea of the Lavalier mic is to get the recording close to your mouth. If your voice comes through just fine using only your Smartphone or equivalent, without the mic, that's fine. No obligation to use. But by freeing up hands and avoiding lots of movement, you can better focus (literally) on the eye test.
- A USB adapter - the microphone can be plugged into this small device's left port (las a mic symbol on it), then plugged into a computer's USB port for access, if using a computer's recording device (a free one in Windows 10). Use this if your computer doesn't have a dedicated input for a microphone. It also has second wire which is an output to a headset, but that should not be required for this study.
These devices are shown in the gallery below.
A word about recording one's visual acuity test.
Someone on the receiving end will have to listen to, understand, and enter the responses in a database. This permits scoring the test, and also safeguarding the data.
That looks like this.

Correct responses are manually checked off from the voice recording.
"OD" = ocula dexter = Right eye; "OS" - ocula sinister - Left eye.
Scores obtained without (on left) and with glasses (on right) have been highlighted in yellow.
For this subject, the left eye was weak (12 of 44 possible points) and this corrected with glasses. The usual Snellen values are presented below each numeric score.
So the spoken letters should be easy to understand on the receiving end.
There is a tendency when reading at the top of the Snellen chart, where letters are large and usually easy to see, to go fast in saying them. Resist this. Speak them fairly slowly and distinctly. Getting to the bottom of the list in record time won't get you a trophy.
Also, say your assigned ID number and what is happening in the test.
For example:
-
-
- "Study ID number 13234-1 Day number 11"
- "No glasses"
- "Right eye covered"
- "E, F, P, T, O, Z" etc.
- When the letters become difficult to read, say so:
- "F, E, L, O, P or maybe F, Z, P ... difficult"
- "Can't read the last two lines ...", or,
- "In the last line I see L, don't know, don't know, O, D, F, O, T maybe."
-
Something like that. If a point is reached where only some letters in a given line are legible, try to include these rather than throwing out the whole line.
This method replaces a second person who would normally be checking off the answers of the person being tested.
But this method does work very well.
We have confirmed that with many control runs on individuals who do and who do not wear glasses. Remember that if one wears glasses, one goes through the Snellen eye chart 4 times:
1. No glasses - Left Eye,
2. No Glasses - Right Eye,
3. Usual distance glasses or contacts - Left Eye,
4. Usual glasses - Right eye.
Reading glasses play no part in this test (other than reading these instructions!).
Don't wear glasses? Just do Left Eye, then Right Eye, using the obturator to gently block the eye not being tested.
Suggestion: Results arrive at "Study Central" as an email with an attached audio file.
So with whatever setup of equipment you finally decide upon, try it out once or twice.
Record a few letters, send them to yourself by email, and see what you think of the result.
We'll be placing a video below to get a clear idea about how this is done.
Most important final words ...
In the email subject line, or text, or in the recording, remember to include two things:
Study ID# assigned to you, and the Study Day# (one of 1, 11, 21, 31).
Otherwise, confusion reigns.
VISUAL ACUITY TEST VIDEO WILL BE INSERTED HERE
<<<< Back to DEMO Index
<<<< Home
The Peripheral Smear Box and Contents
StudyLTCOVID.com
Thanks for visiting!
To translate this page, select your
language from the dropdown menu below:
Traduire avec le traducteur ci-dessus si besoin !

In the Big Box, you'll find the smaller
"Peripheral Smear Kit" box.
This box, close up ...

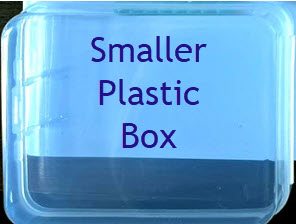
And in that box, is a smaller plastic box, ... like this below :
And in it and packed into the surrounding cardboard box is lots of stuff. I mean, equipment.

Now that it's unboxed, let's do a guided tour.
Left to right, top to bottom, clockwise.

Alcohol wipes. Used before poking a finger to clean and stimulate capillary flow in the periphery (i.e., get your finger ready to be poked).
Used after the poke to put a little pressure on the poke hole and seal it up. (Making it essentially invisible).

Addressed protective padded envelopes for sending back glass slides with peripheral smears. One for Day 0 (before intervention), and one for Day 11 (after intervention with light).
![]()
A 5 mL screwcap vial of fixative for peripheral smears, and a plastic pipette for drawing up some of the liquid. After air-drying the slide for an hour or so, the slide is placed in one of the plastic slide holders, and several drops applied to flood the area of the smear on the slide. After 10 minutes, this can be poured off. The rest will evaporate and disappear. Then the glass slide is placed in a slide holder before preparing it for its trip home.
In some countries, this liquid (buffered methanol) may generate problems at the Customs passage stage. So in such a case, it will be omitted, and slides are simply air-dried and sent.
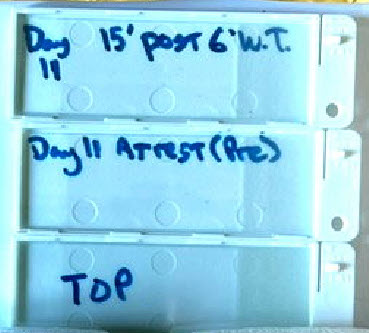
At left, the protective slide holders, just mentioned above.
Here we see them labelled for Day 11 samples. One holds a slide
that is the "Pre" Walking Test sample. The other, 15 minutes "Post"
the 6 Minute Walking Test (6'WT).
The one labelled "Top" has a slide placed in it in this image. Usually
it serves simply as a top cover, with no slide.
They slide together and clip shut, as demonstrated in the video
of the peripheral smear technique. Play with them. You'll get the hang of it.
If you are the point of fixing your slides that have thoroughly air-dried, here is a very brief video that presents how to do that.
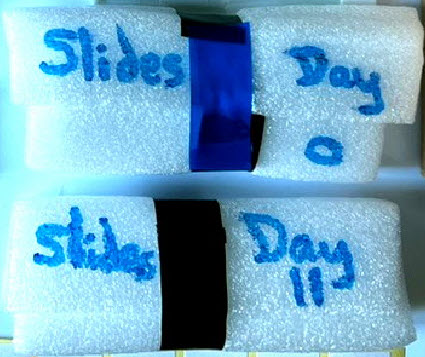
Protective foam wraps, that the above protective slide holders are surrounded with. Here, seen held in place with some electrical tape. Several rubber bands would also work.
Do send back Day 0 slides when they're ready to go. Don't keep them around until Day 11 ! That's why there are two mailing envelopes as as shown above.
The typical mailing delay is bad enough. So send soon.
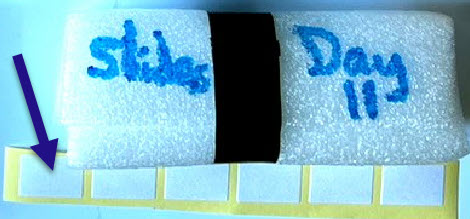
Again, Day 11 protective wrap.
Below the arrow, one sees 6 labels.
Labelling is of course very important to avoid sample confusion when processed in the lab. The current format for these labels is a bit smaller, since the previous larger ones interfered with slide storage. Initially, one can write with pencil on the ground-glass end piece of the slide. That's also the side for the sample. Add the label later.
Include:
Study ID#, Date, Day Number, "Pre" or "Post" 6'WT. There is room on the label if writing small with a ballpoint pen.
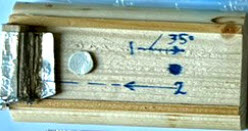
Slide holder platform. A dot of putty below the slide, keeps it stable. Rails on each side help stabilize as well. The written marks remind: size and position for the drop of blood sample. At #1 starts the process of backing up to pick up the sample with a second slide, letting it spread, before #2, pushing it rapidly towards the end block (covered with aluminum foil to keep it clean).

Several things at left. A piece of aluminum foil if needed to replace the one shown above. Lower right, the edge of a slide case, described above. A lancet device ("lancing aid") above, gets unscrewed to hold one of the 8 lancets shown below it. Use the device on #5 setting for an optimum finger "poke." Once done, use the lance end caps to cover the point and avoid injury before discarding.
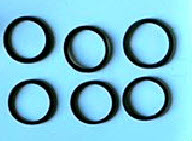
These tiny rubber bands are included to serve as finger tourniquets. Place one or more on the selected "target" finger for a few moments before using the lancing aid and lance, and a good specimen should be generated. May be quite useful for anyone with the "Raynaud's phenomenon" seen in LTC to offset capillary constriction. (Remember to take them off eventually!)
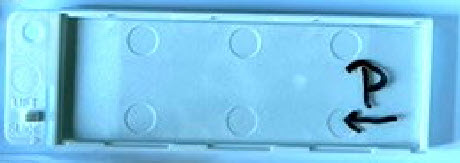
Finally, this shows what we call a "pusher slide" sitting in a protective case. It's labeled with a "P" to help destinguish it when unpacking your box. It's important characteristic is that its corners and edges have been ground smooth. That allows blood cells and plasma to flow along its edges and get smoothly distributed on the underlying glass slide. If used repeatedly, small clots will form along the edge of a "pusher slide," and it is no longer smooth. A streaky smear results. So after a use or two or three, moisten its edge with some water or alcohol and wipe the edge completely clean with a paper towel or Kleenex. In real laboratories, a good "pusher slide" is carefully cleaned after use and set aside for its next use on subsequent days. Lab techs have been known to fight over these.
So that's it ! Your "peripheral smear kit" has been unboxed.
To gain confidence in the technique required, practice it with some soy sauce or ketchup for
a time or six before poking your finger. Sending me a slide with dried ketchup on it may not
be that informative when stained.
The drop needs to be about 10 uL which you are not going to measure of course. The dot on the slide holder platform as shown above, is about the right size. Too big a drop is to be avoided. When looked at with a microscope, all the cells are clumped one on the other, and of little use for most of the observations being made.
A good smear when viewed with the microscopt starts off too thick (near the blood drop), ends up too thin, but has a "happy spot" where cells are nicely distributed one next to the other. This distribution is called "a monolayer." I could look at monolayers all day.
In fact, I have been looking at monolayers all day. Not everyone gets as excited about this.
If "Step 1" is rushed, the sample doesn't spread out enough along the "pusher slide." So a central long, skinny smear results that is limited in what it presents. So give it about 1 to 2 seconds to spread along the slide edge, then rapidly push in the other direction for "Step 2."
"Step 2" is pretty fast, usually less than a second. But don't break the slide!
Practice with the ketchup or soy sauce. Then take a break and make a burger.
Watching how its done in the video makes this much easier and stress free.
Again, fixation of an air-dried slide is covered here.
Soon, you may be looking for a job in a hematology lab.
As always, send along any questions: Questions@StudyLTCovid.com
The Blood Pressure and Pulse, Wrist Cuff Device
StudyLTCOVID.com
Thanks for visiting!
To translate this page, select your
language from the dropdown menu below:
The following video provides a complete introduction into the setup and use of the supplied device.
Mention is first made of the fact that obtaining accurate, reproducible results with this device requires pairing its use with the Vital Signs Stand. This has been constructed specifically for this protocol. It assures that the device used by a seated person, maintains a nearly identical height above heart level when making measurements.
Hand made for your measurement comfort, stability, security and expertise!
Since enrollees vary in height, the more relevant fact is that each enrollees height does not change during the study: A safe assumption. So effects due to the intervention under study on vital sign values, and any changes in these, should not be influenced by variations in cuff position when measuring. There should be very little if the stand is properly used each and every time a series of measurements is made.
The video below makes this clear.
Once the video has been started, click the square at bottom right to watch it Full Screen.
<<< Other Devices
<<< Home
The Pulse Oximeter
StudyLTCOVID.com
Thanks for visiting!
To translate this page, select your
language from the dropdown menu below:
A Pulse Oximeter has been provided to those enrolled in this study.
It is used along with other instruments to measure and document Vital Signs during this study,
and to follow how these values evolve during the intervention with light.
Pulse oximeters measure through intact skin, the level of oxygen saturation of
hemoglobin in red blood cells flowing through the peripheral tissues of an extremity.
That's a very long and scientific way of summarizing what these little devices accomplish.
To use them, one could say: "Stick the thing on your finger, push its button, and read the numbers it's displaying for your pulse (small number) and peripheral oxygen saturation (spO2, the large number)."
Actual use is essentially that simple.
But for a bit more information on the actual device enrollees in the study are using, and a few tips and tricks related to these measuring tools, view the video shown just below.