
Unboxing
StudyLTCOVID.com
Thanks for visiting!
To translate this page, select your
language from the dropdown menu below:
Servez-vous du traducteur ci-dessus si besoin.
The Big Box Contents: the role of each item, and how to use, in the "Quick Impressions" protocol.

The goal here is to avoid surprises or confusion when you receive the material sent to you as a participant. While the content is described here below, related links are of course not in the box !
- Day 0 envelope - instructions for tests to be done Day 0 before starting the intervention with light.
While everything mentioned therein is available online at this StudyLTCovid.com site, printed copies of the Trail Making Tests, parts A & B, and the Mental Status Exam (if doing this in French) are in this envelope.
These, for convenience only since versions are found online. The Snellen eye chart is included.
- Day 11 envelope - instructions for tests to be done Day 11, after the 10 days of intervention with light have been completed. These paper sheets obviously do not contain working links, so use the links found on this site to find the page that presents the links to the tests and surveys used for reporting your results. The envelope also contains some convenience printouts. (e.g., Trail Making Tests copies). Links will be added on this page where they can help make things easier.
In the galleries that follow, if the speed of automatic presentation is not what you like, click the row of images at the bottom of each gallery, and select any image as desired.
- Box with LED light source and its holder (and UK adapter if needed). You'll notice that the lamp face has 9 'red' LEDs (660 to 670 nm) and 9 'near-infrared' LEDs (830 to 850 nm) when it's turned on. The latter are hard to see but are in fact on. In the middle, a 1.25 cm thick 'button' that serves as a reminder of the desired distance from the lamp during the intervention. One can move a bit further away (3 to 5 cm), but the energy transmitted (40 Jouls/ cm²) drops off quickly with longer separations from the lamp.
Why are these lamps number-coded ?
So we can track you down if you break one !
No, not really.
We use these codes to identify when a lamp was put in service.
We have found that if used every day for 20 minutes, at the end of 1 year a lamp has lost 8% of its power consumption. Different componets (resistances, diodes for instance) may eventually wear out.
That suggests a possible loss of 8% of its energy output.
Comparing interventions done with very old lamps with very new should therefore be avoided in a study like ours. That's just what we do currently.
---------
- Stability Stand for use with the light source (see gallery of images below)
- wooden base with attached PVC base
- a 40 mm diameter PVC pipe (the first upright) with an attached screw. A mark has been
placed on this pipe and its base, to more easily align them when placing the screw.
- a 30 mm diameter PVC pipe that fits inside the 40 mm pipe, and moves to adjust height.
It has an angle and a "T" at the top, with two screws in it.
These serve to stabilize the lamp's holding clamp (see images)
It has some black tape wrapped on it to reduce movement when placed within
the larger pipe.
- a 32 mm PVC clip is already on the 30 mm pipe. This can be used to slide up and down to
adjust the height of the LED lamp for the intervention for head and/ or back.
- a metallic spring clamp with red protective ends.
VERY IMPORTANT ! - it permits clamping the wooden base to
a shelf, desk or table corner to avoid crashing everything to the floor.
A LED lamp that has crashed to the floor will usually require major repair.
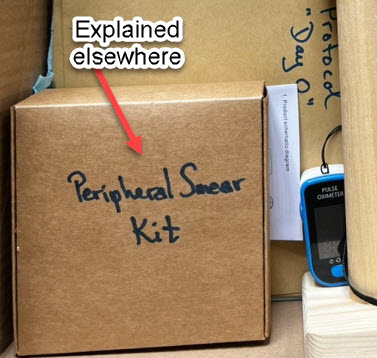
- a box labeled "Peripheral Smear Kit" whose contents and their use are covered elsewhere.
That page is linked to here: Peripheral Smear Kit.
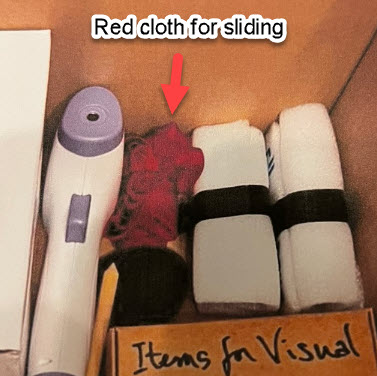
- a crumpled up red 50 cm diameter cloth circle.
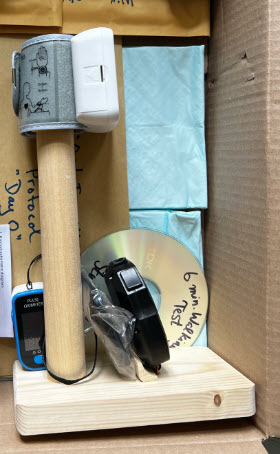
- a wooden stand with its base, a wooden upright, and rounded top where one grasps. In this image, the blood pressure cuff has been placed upon it, hiding the rounded top.
- a wrist blood pressure cuff is here atop the stand. It measures systolic and diastolic blood pressure and the pulse.
- a pulse oximeter. It measures peripheral oxygen saturation. You are probably quite familiar with this device now. This model has a button to start it measuring. It stops when measurements have been completed. The button also serves to invert the display while measuring, so numbers are easier to read, as needed. We usually hold the wooden stand top with 3 fingers and thumb, and extend the index to place the pulse oximeter. BP cuff just to the arm side of the wrist.
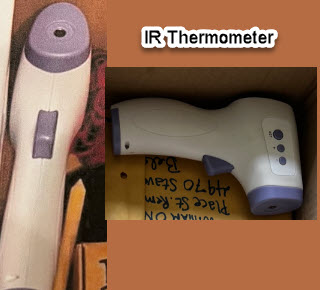
- an infrared thermometer. It measures surface temperature. As a reminder, we prefer to aim it at an open mouth rather than the forehead. Turn it around like seen on the left, and squeeze its button with your thumb. It beeps when done measuring.
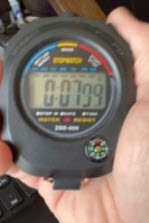
- a chronometer or stopwatch. Right button to start/ stop. Left button to reset. Middle button to switch from stopwatch mode to current time. It has a little wire loop at its base. The wooden stand has two little holes drilled in it to place the chronometer upright, using this bent copper wire. (See two images above this one).
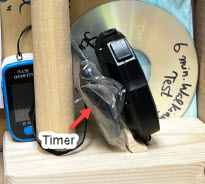
- a kitchen timer. This should be set to 5 minutes. When it counts down and rings, simply restart it for the next 5 minute interval. (Useful during 6 Minute Walking Test since Vital Signs are taken after 5 minutes rest, immediately after walking (Time 0), and at 5, 10, and 15 minutes thereafter. Each time, restart the timer to stay on target with the correct timed intervals, then proceed to take the Vital Signs.The timer has a magnet on its back. A nail that it sticks to, has been placed on the wooden stand to keep it handy.
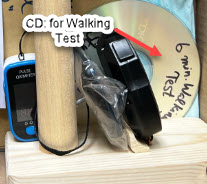
- a Compact Disc labeled "6 Minute Walking Test" which gives the pace when carrying out this part of the protocol. There are links to this on the site if you prefer or don't have a compact disk player. Copy it to whatever device is most convenient for you. Those with a treadmill and the pace information provided in the instruction sheets, don't need this.
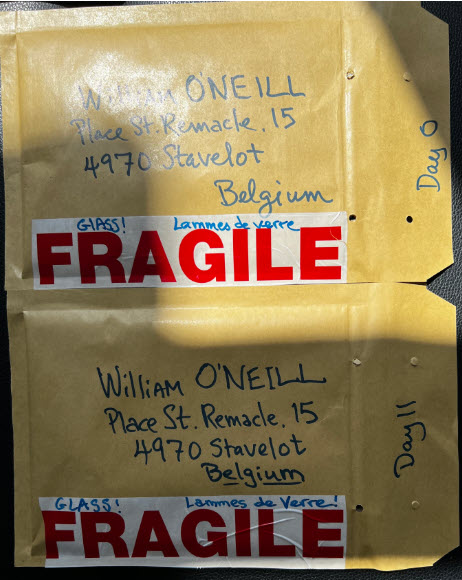
- two pre-addressed envelopes. These are used to mail back the completed peripheral smear slides in their plastic cases. (Two slides, Day 0; Two slides, Day 11; each day placed in 3 protective plastic cases for the slides. Then wrapped in the supplied foam to avoid broken glass during delivery. See these below.).
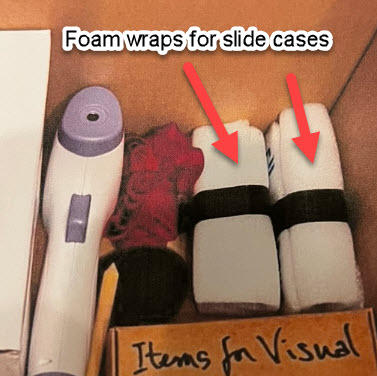
- two foam wrappers labeled 'Day 0' and 'Day 11'. These wrap around the plastic cases that hold the glass slides.
- So, slides get prepared (covered elsewhere);
- - get placed in plastic cases (covered elsewhere);
- - those get wrapped in these foam wraps shown at left (use electrical tape or other to keep them in place).
- - Then they are sent back (one wrap at a time) on Day 0 and again on Day 11 in the supplied envelopes shown above.
- If the postage is expensive let us know and we'll refund it.
- If based on weight, it shouldn't be expensive.
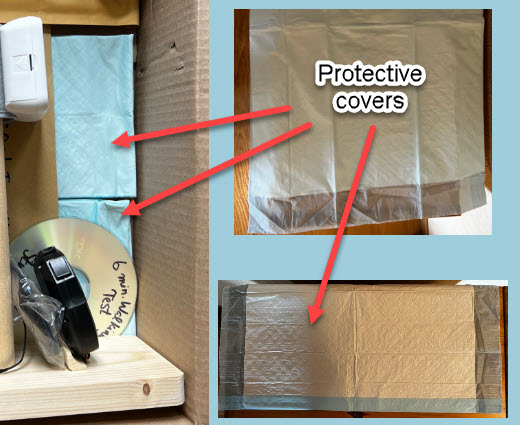
- two folded light blue protective items. Used to spread out and have a protective work surface to avoid spills and stains on your desk or table, on 'Day 0' and 'Day 11'. We used to call these "Chux" when working at the hospital, because once used, they were "chucked" away.
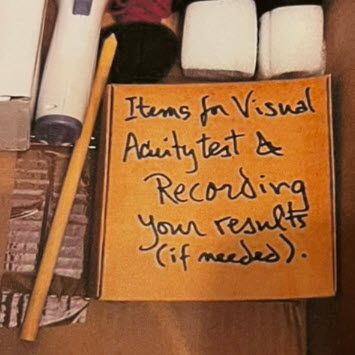
- The 6 items below are used to perform the Visual Acuity test that is part of the protocol.
Details of how to use these in doing that test are presented on the site.
- a lavaliere microphone (plugs into a SmartPhone).
- an adapter for a PC USB port if needed for the mic.: If using an app on PC to record.
- a string with a knot at each end to measure 3.05 meters or 10 feet
- a sticker to place on a wall or other surface to remind about this distance from the Snellen eye chart.
- a printout of the Snellen eye chart at 10 feet (since usually done at 20 feet).
- an eye obturator (black ellipse on a stick) to cover the eye not being tested (also fits under glasses). It's seen in this photograph at left.
>>> Peripheral Smear Kit - Box and Contents >>>
A découvrir aussi
- Adding to a "Quick Impression."
- "Quick Impressions" - DAY 0 and DAY 11 envelopes
- Day 11 of the “Quick Impressions” protocol of study